发布 Maven 构件到中央仓库
我们经常会在公司内部写一些 Java 组件/工具,通过安装到本地或者发布到公司的 maven 私服,其他同事就可以在 pom.xml 文件引入你的组件了。
但是如果你想把这个组件(工具)开源,给更多的小伙伴使用,那你就得把你的构件发布到 Maven 中央仓库。
本文详细介绍如何发布自己的 maven 构件到中央仓库。
# 注册Sonatype的账户
maven 中央仓库是有一个叫做 Sonatype 的公司在维护的,在发布构件之前需要 注册一个账号, 记住自己的用户名和密码,以后要用。
注册地址:https://issues.sonatype.org/secure/Signup!default.jspa (opens new window)
同时,还要记住一个地址,将来在查询自己所发布构件状态和进行一些操作的时候要使用
https://oss.sonatype.org/ (opens new window)
# 提交发布申请
提交申请,在这里是创建一个issue的形式,创建地址:
https://issues.sonatype.org/secure/CreateIssue.jspa?issuetype=21&pid=10134 (opens new window)
在填写issue信息的时候,有一些需要注意的地方:
- "group id" 就是别人在使用你的构件的时候在 pom.xml 里面进行定位的坐标的一部分,最好是自己的域名倒序,如: org.rockyang, 如果自己没有域名就填写自己在 github 的域名:io.github + {你在 github 的用户名},如:io.github.yangjian102621
- "project url" 是这个项目站点,填写你的 github 项目地址即可。
- "SCM url" 这个一般就是你的项目的 clone 地址,比如我的是 https://github.com/yangjian102621/mybatis-kits.git (opens new window)
提交之后需要等工作人员离开确认。如果你填写的是自己的域名,工作人员会问你是不是真的是自己的域名,你需要向他证明你确实拥有这个域名。
一般就是让你做个 TXT 解析或者做个重定向到你的 github Pages 页面。
下面是我的 issue 地址,不知道怎么填的同学请直接参考我的:
https://issues.sonatype.org/browse/OSSRH-49428 (opens new window)
需要说明的是,由于我用是 .org 域名,在国内自 2018年起,org 域名无法实名认证,也不能备案,导致我的域名无法解析,所以我不得不提供
域名证书,解析证明这些,工作人员才给我审核通过。
所以,如果你也是 org 域名,议你先把域名从阿里云这些国内运营商转出到国外的域名运营商。否则你也会无法解析
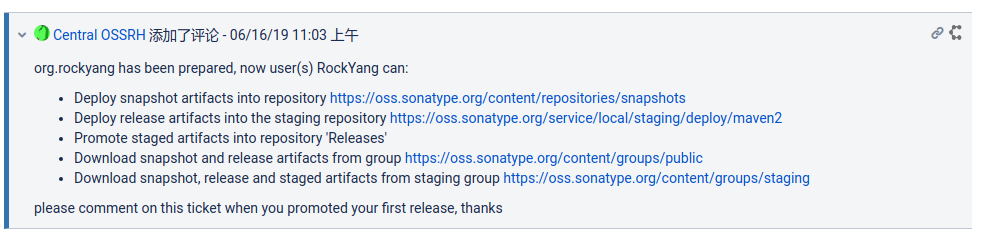
审核通过以后,你会收到如下回复:
# 准备 GPG 秘钥
上传构件的时候需要 GPG 秘钥进行签名,所以我们需要先生成 GPG 秘钥:
gpg --gen-key

gpg (GnuPG) 2.2.4; Copyright (C) 2017 Free Software Foundation, Inc.
This is free software: you are free to change and redistribute it.
There is NO WARRANTY, to the extent permitted by law.

Note: Use "gpg --full-generate-key" for a full featured key generation dialog.

GnuPG needs to construct a user ID to identify your key.

Real name: yangjian
Email address: rock@qq.com
You selected this USER-ID:
    "yangjian <rock@qq.com>"

Change (N)ame, (E)mail, or (O)kay/(Q)uit? O

generator a better chance to gain enough entropy.
gpg: key 9E81A728737D0E7F marked as ultimately trusted
gpg: directory '/home/rock/.gnupg/openpgp-revocs.d' created
gpg: revocation certificate stored as '/home/yangjian/.gnupg/openpgp-revocs.d/52433C774B2B9FFEFB722F269E81A728737D0E7F.rev'
public and secret key created and signed.

pub   rsa3072 2019-06-16 [SC] [expires: 2021-06-15]
      52433C774B2B9FFEFB722F269E81A728737D0E7F
uid                      yangjian <rock@qq.com>
sub   rsa3072 2019-06-16 [E] [expires: 2021-06-15]
需要输入姓名、邮箱等字段,其它字段可使用默认值,此外,还需要输入一个 Passphase,相当于一个密钥库的密码, 一定不要忘了,也不要告诉别人, 最好记下来,因为后面发布构件的时候会用到。
Note: 生成秘钥后你需要把你公钥发布到公钥服务器托管,
sonatype支持很多服务器,如ubuntu,keyservers等。
gpg --keyserver hkp://keyserver.ubuntu.com --send-keys 9E81A728737D0E7F
发布之后你可以使用下面的命令验证是否发布成功
gpg --keyserver hkp://keyserver.ubuntu.com --recv-keys 9E81A728737D0E7F
如果看到类似下面的输出,则说明已经发布成功了
gpg: key 9E81A728737D0E7F: "RockYang <yangjian102621@gmail.com>" not changed
gpg: Total number processed: 1
gpg:              unchanged: 1
# 配置 settings.xml
找你所使用的 maven 的配置文件(一般在 ~/.m2/settings.xml),在配置文件中找到节点, 这个节点默认是注释了的,
我们就在这个注释的外边增加一个的配置如下:
<servers>
    <server>
        <id>oss</id>
        <username>用户名</username>
        <password>密码</password>
    </server>
</servers>
这里的 id 是将来要在 pom.xml 里面使用的,每个 server 的 id 都不同,用来区分你是要把构建发布到哪个仓库,
用户名和密码就是在 Sonatype 上面注册的用户名和密码。
# 修改项目的 pom.xml 文件
为了把构件发布到中央仓库, 我们必须在 pom.xml 中配置一些关键信息,否则会影响发布审核。
这些信息包括:name,description,url,licenses,developers,scm 等基本信息。
下面贴上我的配置示例:
<groupId>org.rockyang</groupId>
<artifactId>mybatis-kits</artifactId>
<version>1.5.1</version>
<packaging>pom</packaging>

<name>mybatis-kits</name>
<description>MyBatis 增强工具包,实现了便捷的单表 CRUD,各种自定义条件查询,以及物理分页查询</description>
<url>https://gitee.com/blackfox/mybats-kits</url>

<modules>
	<module>mybatis-kits-core</module>
	<module>mybatis-kits-spring-boot</module>
	<module>demos</module>
</modules>

<licenses>
	<license>
		<name>The Apache Software License, Version 2.0</name>
		<url>http://www.apache.org/licenses/LICENSE-2.0.txt</url>
	</license>
</licenses>

<developers>
	<developer>
		<name>RockYang</name>
		<email>yangjian102621@gmail.com</email>
	</developer>
</developers>

<scm>
	<connection>scm:https://gitee.com/blackfox/mybats-kits.git</connection>
	<developerConnection>scm:https://gitee.com/blackfox/mybats-kits.git</developerConnection>
	<url>https://gitee.com/blackfox/mybats-kits.git</url>
</scm>
然后需要在 <build> 里面增加 java-docs-plugin 和 maven-sourece-plugin,这个是必须要增加的,分别用来为你的代码生成 Java Docs 和打包源码。
<build>
	<plugins>
		<!-- packaging source code -->
		<plugin>
			<groupId>org.apache.maven.plugins</groupId>
			<artifactId>maven-source-plugin</artifactId>
			<version>${maven-source-plugin.version}</version>
			<executions>
				<execution>
					<id>attach-sources</id>
					<phase>verify</phase>
					<goals>
						<goal>jar-no-fork</goal>
					</goals>
				</execution>
			</executions>
		</plugin>
		<!-- Javadoc -->
		<plugin>
			<groupId>org.apache.maven.plugins</groupId>
			<artifactId>maven-javadoc-plugin</artifactId>
			<version>${maven-javadoc-plugin.version}</version>
			<!-- skip javadoc error -->
			<configuration>
				<failOnError>false</failOnError>
				<doclint>none</doclint>
			</configuration>
			<executions>
				<execution>
					<phase>package</phase>
					<goals>
						<goal>jar</goal>
					</goals>
				</execution>
			</executions>
		</plugin>
	</plugins>
</build>
再增加一个 profile,名为 oss,下面贴上我的,我这里配置了两个 profile, 一个是用来发布到公司内部 Nexus maven 私服的。
<profiles>
	<!-- local nexus repository for test -->
	<profile>
		<id>dev</id>
		<properties>
			<profiles.active>dev</profiles.active>
		</properties>
		<!-- configures for artifact deployment -->
		<distributionManagement>
			<repository>
				<id>releases</id>
				<name>Release Repository</name>
				<url>http://192.168.0.135:8081/repository/maven-releases</url>
			</repository>
			<snapshotRepository>
				<id>snapshots</id>
				<name>Snapshot Repository</name>
				<url>http://192.168.0.135:8081/repository/maven-snapshots/</url>
			</snapshotRepository>
		</distributionManagement>
		<activation>
			<!-- default active -->
			<activeByDefault>true</activeByDefault>
		</activation>
	</profile>

	<!-- Central maven repository -->
	<profile>
		<id>oss</id>
		<properties>
			<profiles.active>release</profiles.active>
		</properties>
		<distributionManagement>
			<snapshotRepository>
				<id>oss</id>
				<url>https://oss.sonatype.org/content/repositories/snapshots/</url>
			</snapshotRepository>
			<repository>
				<id>oss</id>
				<url>https://oss.sonatype.org/service/local/staging/deploy/maven2/</url>
			</repository>
		</distributionManagement>
		<build>
			<plugins>
				<!-- Gpg Signature -->
				<plugin>
					<groupId>org.apache.maven.plugins</groupId>
					<artifactId>maven-gpg-plugin</artifactId>
					<version>1.6</version>
					<executions>
						<execution>
							<id>oss</id>
							<phase>verify</phase>
							<goals>
								<goal>sign</goal>
							</goals>
						</execution>
					</executions>
				</plugin>
			</plugins>
		</build>
	</profile>
</profiles>
我这里是把
dev配置成默认发布仓库,所以给devprofile 添加了<activeByDefault>true</activeByDefault>配置。 而且你可能也注意到了,ossprofile 里面我配置了maven-gpg-plugin,这个是发布到中央仓库必须配置的,用来签名,否则发布会失败。 而我的本地仓库是设置为不需要签名的,所以发布到本地仓库的devprofile 就不需要配置gpg插件。
# 上传构件到 OSS
编辑完 pom.xml,我们就可以进行上传、发布了。在命令行进入项目pom.xml所在路径,执行:
# 发布到本地仓库
mvn clean deploy
# 发布到中央仓库
mvn clean deploy -P oss
在编译打包完成之后,会弹出对话框,要你输入 gpg 密钥库的密码,这个密码就是刚刚你创建 gpg 秘钥时候输入的密码,输入即可完成上传。
当然有时候不会弹出输入密码的输入框,只是提示需要输入密码,根据gpg插件的官网解释,需要加上密码作为参数执行命令,即:
mvn clean deploy -P oss -Dgpg.passphrase=密码
# 在 OSS 中发布构件
构建上传之后需要在 OSS 系统中对操作进行确认,将构件发布,进入 https://oss.sonatype.org/ (opens new window)
使用你的用户名和密码登陆之后:
- 在左边菜单找到
Staging Repositories,点击,在右边上面一点有一个输入搜索框输入你的 groupid 进行快速定位, 可以发现这时你的构件状态是open。 - 勾选你的构件,查看校验的结果信息,如果没有错误就可以点击刚才勾选的 checkbox 上面右边一点的
close按钮,在弹出框中confirm, 这里又需要校验一次,稍后结果会通过邮箱通知。
注意,你执行 release 成功之后,OSS 里面就没有这个构件了,原因是被同步到 maven 中央仓库之后,这条记录就被从 OSS 删除了。
# 通知 sonatype 关闭 issue
回到 issue 系统,找到你的那个申请发布构件的 issue,在下面回复工作人员,说明构件已经发布,待工作人员确认后,会关闭这个issue。

# 搜索并使用构件
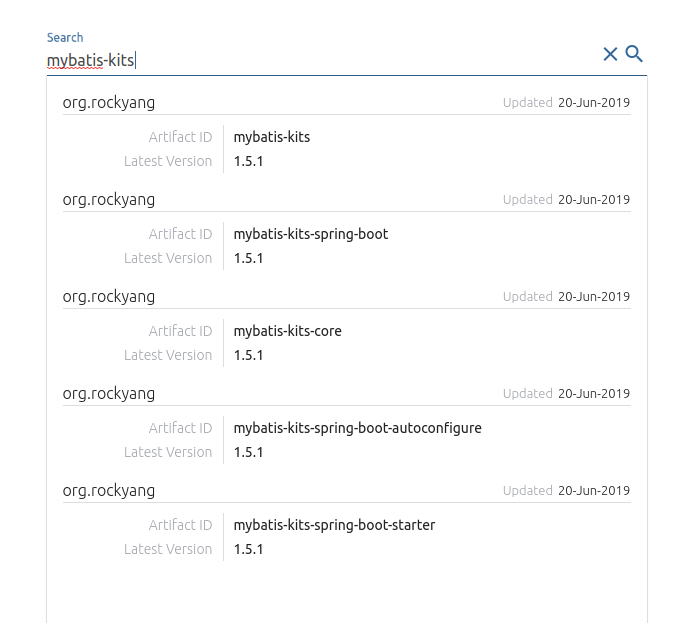
一切完成后并不可以马上就使用你所发布的构件,得等系统将你的构件同步到中央仓库之后才可以使用, 这个时间至少要2个小时, 然后就可以在中央仓库的搜索页面 http://search.maven.org/ (opens new window) 搜到你的构件了。
# 下次再发布
你可能要问,要是每次发布都这么麻烦,岂不是要被折腾死,Sonatype 的审核工作人员也受不了。
答案是:完成第一次的发布之后,以后的版本发布就会相对简单多了。
以后的发布流程:
- 构件准备好之后,在命令行上传构建;
- 登录 https://oss.sonatype.org/ (opens new window) , close 并 release 构件;
- 等待同步好(大约2小时多)之后,就可以使用了
这里需要注意几点:
- 第一次成功之后,以后就可以使用你的 groupid 发布任何的构件了,只需要你的 groupid 没有改变。
- 同一个构件同一个版本只能发布一次,也就是说你能不覆盖某个版本,另外,版本发布之后就也能删除。
# 添加自动发布构建 maven 插件
尽管第一次以后的发布流程相对于第一次发布来说,已经大大简化了,但是我可能还是会觉得太麻烦了,有没有一个工具能在我上传之后自动给我发布, 也省去了我每次去登录 https://oss.sonatype.org/ 手动发布了(讲真,https://oss.sonatype.org/ 打开真不算快)。
答案是:还真有这么一个插件,它就是: nexus-staging-maven-plugin
只需要在你的 pom.xml 的 build 配置中加上下面的配置:
<plugin>
	<groupId>org.sonatype.plugins</groupId>
	<artifactId>nexus-staging-maven-plugin</artifactId>
	<version>${nexus-staging.version}</version>
	<extensions>true</extensions>
	<configuration>
		<serverId>oss</serverId>
		<nexusUrl>https://oss.sonatype.org/</nexusUrl>
		<autoReleaseAfterClose>true</autoReleaseAfterClose>
	</configuration>
</plugin>
一切问题迎刃而解了,以后你想要把你的构建发布到中央仓库,唯一要做的就是执行:
mvn clean deploy -P oss
以上就是关于发布构件到 Maven 中央仓库的所有操作流程,完整的 pom.xml 配置请参考:
https://gitee.com/blackfox/mybatis-kits/blob/master/pom.xml (opens new window)
# 参考链接
本站博文如非注明转载则均属作者原创文章,引用或转载无需申请版权或者注明出处,如需联系作者请加微信: geekmaster01